Showing posts with label Tutorial. Show all posts

Saturday, July 12, 2014

f(x) 'Red Light' MV Inspired Look - Krystal

Hey, I love it when my favourite K-pop groups make a comeback, especially girl groups because I always look forward to seeing their concept for their 'teaser' photos and music video, and to possibly get some inspiration from those. Think of these concepts as 'cosplay' with all the different hair colours and costumes but not based on any particular character and are created by their stylists. f(x) recently came back with their 'Red Light' title track and album and their style is not overly cute nor sexy (the two concepts that many girl groups aim for these days) but instead consists of dark makeup and camo-style outfits. From seeing f(x)'s teaser photos and music video, I was immediately inspired to create one of their looks on myself and share on my blog for fun. Here's how it went:
 
 
I decided to base my look on f(Krystal) because out of all the members, hers looked the most dramatic and when it comes to inspired looks like these, the more dramatic the better! And she dyed her hair platinum blonde and then I remembered I had a blonde wig (which I rarely use) and was perfect for this :D
 
Here are more shots of Krystal from the MV:


She wore a headpiece and a crown
 
The thing that really captured my attention from the look was the one black, smokey eye and the other almost completely bare with a coloured contact lens on. This was pretty consistent with all of the members however I felt that Krystal stood out the most with her super dangle-y headpiece and ice-like crown/headband (where would I get one of those?!)
 
As I say for all of my inspired looks, my intention is not to create a replica or tutorial on how to get this look - this is just my own interpretation where I have used items that I already had, to look as close as possible to the items worn by Krystal.
 
A tick for the blonde wig, a tick for an army-green jacket but with the headpiece... that was where I had some issues. Considering that I never wear headpieces or anything on my head (if you see me with a headband a la cat ears, it means I'm wearing them for a special occasion), I wasn't thinking about buying one and thought I could just wrap some gold chains around my head... but that didn't work. 
 
I had a browse online and found this one and thought it was perfect but now it's sold out!!! And it's called 'Crystal' like Krystal too, omg. I settled for the cheapest one I could find in the store ($4, online it's still full price) to wear and draped gold chains over it. Unfortunately I only had two gold chains and I didn't have crosses but I had butterflies:

Accessories sorted!

These are the products (minus tools such as brushes) that I used to achieve the inspired look:


FACE:
ELES Age Defying BB Cream 30*
Tony Moly Crystal Light Gold Beam
Rimmel Stay Matte Dual Action Concealer 
Ardell Brow Sculpting Gel

EYES:
GEO Angel Blue Lenses
Australis Eyeshadow Primer
ELES Signature Shadow Quad in Minimalist*
ELES Mineral Matte Shadow in Sand*
Australis Eye Pencil in Blackest Black
Rimmel Soft Kohl Eye Liner Pencil in 071 Pure White
Maybelline HyperSharp Liner
Benefit They're Real! Push-Up Liner (still trialling for review purposes)*
Maybelline The Falsies Waterproof Mascara
Dolly Wink Eyelash Glue
Taiwan Bottom Lashes in 011

LIPS:
Revlon Super Lustrous Lipstick in 625 Iced Amethyst
Couleur Caramel Rouge a Levres Lipstick in 119*


I used the lightest shade of BB Cream that I had to correspond with Krystal's pale complexion and used concealer for extra coverage. I highlighted my nose bridge, brow bone, cheek bones and cupid's bow. For my brows, I kept them a natural brown like Krystal's and used my light brown brow gel to fill and lighten them up a bit. I couldn't see any blush on Krystal's cheeks so I didn't apply any.

Krystal's contact lens is a blue-green colour with no limbal ring (the black around a circle lens to give a dolly look) however I didn't have any other lenses that were blue so I used my GEO Angel Blue ones. This gave my eye a more doe-eyed look compared to Krystal's.


Left eye (no lens):

I applied eyeshadow primer all over my lid and applied black matte eyeshadow right up to the groove of my eye socket. I also applied the eyeshadow to my bottom lash line. I then used the brown matte eyeshadow and placed it right above the black eyeshadow and directly under the black used on the bottom lash line. I blended these together to create a smokey look and minimise any harsh lines. I winged my eyeliner, curled my lashes and applied a few coats of mascara. I used bottom lashes (half) that had a similar thick-thin style.

Right eye (lens):

Again, eyeshadow primer went on first and then a sand-coloured matte eyeshadow all over my eyelid and bottom lash line. Using my liquid eyeliner, I drew a thin line on top of the lashes and applied white eyeliner on my waterline. I finished it off with curling my lashes and applying mascara to the top and bottom lashes.

It all sounds pretty straight forward but it took me a few tries to get the smokey eye right and the way I wanted it to be. Perhaps it's because I hadn't done one in such a long time. Anyway I'm glad I only needed to do it on one eye or else it would've taken me even longer!

And finally to the lips:

It's so weird seeing the blonde against the bottom half of my face... doesn't even look like me o_o

I made my top lip look thinner than usual and my bottom lip slightly thicker (not like it needed to be any more thick haha). Krystal's got a dark ombre lip going on with purple matte lip products. I've only got one purple matte lipstick and it happens to be my darkest one, so I used it for the centre of my lips. The outer lipstick is a lighter purple and has a creamy consistency, hence the glossiness. I could have went for fully-matte lips but I didn't want to risk drying out my lips, plus I prefer smooth, glossy lips!

So there we go, the finished look where I had a few hiccups along the way with the accessorising and makeup application but overall I'm pleased with how it turned out :)

In the end I even added a small 'freckle' near the side of my nose, Krystal-style!

Oh and here's the full MV if you're keen to see the rest of the girls' looks and/or listen to their latest track:


Questjen for you:

Whose look did you like the best in the Red Light MV?

If you don't know their names, you can identify them by their hair colours/styles

I could say good things about each look and although I was most inspired by Krystal's, I was fangirling the most over Sulli! I wanted to recreate her look too but I didn't have brown lenses or the right accessories~


She's the youngest member of f(x) and she's all grown up looking more and more stunning

I hope to do more of these inspired looks in the near future and if there are any requests, feel free to shoot them my way!


Disclaimer: This is not a sponsored post, nor am I affiliated with any of the companies mentioned. Products marked with a * had been provided for consideration.

Thursday, June 12, 2014

Benefit Brow Bar Opening Party

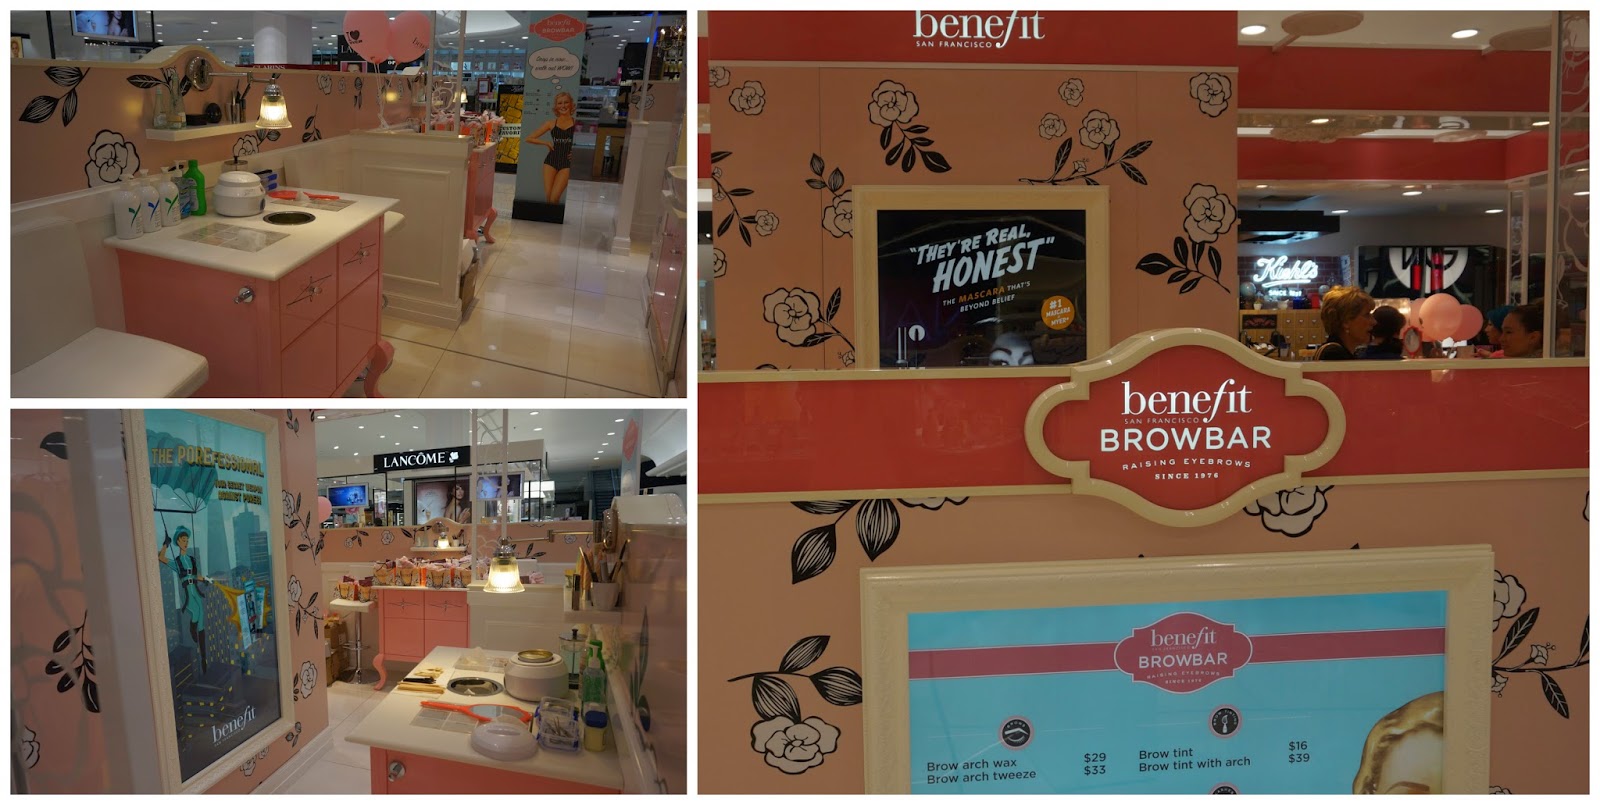
Hi everyone! Myself and some blogger girls were invited to the re-launch of the Benefit counter at Myer with the addition of the new Brow Bar, the first in our city (finally). This happened back in April and I managed to snap a number of photos of the place on the night and watched a demo of the brow waxing service.

Nothing like how it looked before! Wish I could show a before and after pic

Nibbles and drinks! Benefit MUA and blogger Kitty at the back, working her magic on Monnie


Not only do I adore how Benefit's makeup displays look but also their ceiling design and drawers. I wish they could sell these too because I'd love to have these items in my room/house, hehe.


And just in case you've never seen one before, here's what the Benefit brow bar looks like:

It was my first time seeing one, and being in one

We were told that all Benefit beauticians who specialise in waxing services are professionally trained and qualified, and all beauticians in Benefit Brow Bars across the world have the same expertise so you'll have the same service no matter which Brow Bar you visit, whether it'd be in Australia or Singapore, just as an example. So if you're on a holiday/working overseas and badly need your brows done, have no fear because you can look for your nearest Brow Bar and be assured that the service will be superb!

A brow demo was done on the brows of Benefit's Digital Media Manager, Rachel:

Method used to create the perfect arch

Tinting the brows to prepare for waxing (adheres to the hair)

Wiped off the tint and now time for the waxing

Great brows on a happy Rachel (I'm envious!), then to apply some brow products

I was very excited to be told that we'd each be getting a complimentary brow waxing service done - so excited that I booked myself in for the next day! Here are the results:

Look how good the 'after' is!! Strong brow game ;)

Also wearing Benefit's Lollitint on my cheeks and lips, applied by Kitty. I love it!

I've always been pretty self-conscious about my brows and after this service, I realised how important it is to fill in my brows (I have always done so but very lightly) and have them properly shaped. Now I know that this type of arch suits my face and features so from now on I'll make sure to properly groom my brows :)

At the end of the opening party, we were given goodie bags and these were inside:


A handy cosmetics bag

Woohoo for a brow gel! I'm a big fan of that little wand

Benetint is a pretty rose tint

I also received two products that I've tried before - the They're Real Mascara and the POREfessional (sample size). The funny thing about the They're Real Mascara is that the first tube I received last year had a very wet formula which I disliked however the new one I received this time has a much better formula and it has now become one of my favourite mascaras! This just goes to show that  products can have inconsistencies and it's always best to give something another shot because it could just be your specific one that's faulty. I'm so glad to get a brand new tube because now I can actually understand the hype!!

Comparison between my new one (left) and my old one (right). Sticker inconsistencies?

Received the sample size, received the full size previously

If anyone would like me to review any of the items above, please feel free to let me know! But speaking of Benefit (haha, I've been speaking about Benefit throughout this post :P), they've just released a new product *gasps* I've got my hands on it and here's a sneak peek of what it is, though I'm sure many of you know about it already...

Shall review this in an upcoming blog post - watch out for it if you're keen :)

It has come to that time of the year again where leisure activities are put on hold for a temporary time while I study hard (or hardly study, jk) for my exams. Will definitely be needing all the luck I can get!


PS: Thanks for the birthday wishes in my last post! Nice to hear from you guys~ ^^

Follow on Bloglovin

Disclaimer: Products were provided for consideration with no obligation to share or review. This is not a sponsored post, nor am I affiliated with the company mentioned in this post. All opinions stated by me are 100% honest with no bias. See more at http://www.questjen.com/p/disclaimer.html for full disclaimer. 

Friday, January 31, 2014

Tony Moly Cat Chu Wink Mini Tony Tint Review

I want to start by saying Happy Lunar New Year!! I tend to find this celebration more exciting than my own birthday or even Christmas LOL because it means a lot to me and my family - ah, the good old family tradition of a gathering and a feast, and who could forget about them red pockets/li xi :D Whether you celebrate it or not, I wish everybody good luck and good health (and wealth hehe).

For the Lunar New Year celebrations, the colour red is used for decorations, traditional costume and gifts as it is a symbol of good luck and is supposed to ward off the evil spirits. Funnily enough, the product that I'm reviewing on my blog today is just that colour - what better way to start the Lunar New Year than sharing something red! A red lip tint to be exact ^3^

This review was requested by Weng Chin (hello!)

Sample size: 3 g
Price: N/A

The product has a really long name and to make things easier I'm going to call it 'Tony Tint'. This was a sample product that was in my recent Beauty Net Korea haul (see my previous post) and it's a product that I've seen and heard about before. I have to admit that I'm not a big fan of lip tints, simply because I prefer to use something that feels moisturising on my lips. But I must say that I love the way lip tints look on the lips!

The full size of the Tony Tints look like this:

Apparently these were endorsed by K-pop trio JYJ, hence the three different shades

The one that I have is the sample of the first one, #01 Cherry Pink (체리핑크) and even by just looking at it through the plastic, it definitely reminds me of a cherry!

A sponge applicator, similar to the ones used for lipgloss tubes

 One swipe of the lip tint on the back of my hand
(Excuse the veins! They don't normally stick out so much)

The tint after rubbing it onto the back of my hand

A little goes a long way with this tint, but luckily not in a way that's overpowering or too pigmented on the skin. It's definitely much lighter than the initial swatch and it was really simple to blend. I love the way it looks and I can tell that it'd make a great product for gradient lips which is quite a trend right now. Also, I reckon it can also double as a cheek tint because there usually are cheek and lip tint combos, although this doesn't specifically state that it's for the cheeks too. However, I wouldn't be brave enough to apply tint over my cheeks as I prefer to have something way less pigmented so that I can build up the colour intensity if needed :)

For a gradient-lip look I decided to follow a tutorial to achieve the best results possible:

Credit: Beauty Net Korea


You may remember my Goo Hara (Damaged Lady - KARA MV) inspired look where I did a gradient lip but used red lip gloss and pink lipstick. With the lip gloss, the effect didn't stay put and I remember having to reapply my lip gloss because it kept mixing with my lipstick! With the lip tint however, the gradient effect was much more subtle and it made blending a whole lot easier. I would say that the best way to achieve a gradient lip would be to use lip tint and lipstick or gloss :)

I was curious to see how the Tony Tint would look if I used it all over my lips as a lip stain and here are the results:

The centre of my lips was already tinted from the gradient look

I must say that it makes a gorgeous cherry red as a full colour over the lips. It's not a colour that I tend to wear but it looks super pretty, especially on those who are fair-skinned (I wouldn't say that I am but I think it still looks good!) And the fact that it is a stain means that you won't need to reapply your red lippie or worry about it getting all over your teeth :D

Pros (+) and Cons (-):

+ Cute packaging (yay cats)
+ Long-lasting
+ A little goes a long way with pigmentation
+ Sponge applicator, easy to use
+ Liquid is easy to blend
+ Bearable scent, not too overpowering
+ Contains jojoba oil for supple lips
+ For full size: 10 mL (7.99 EUR) approximately 10.8 USD. Decent price
- Stains fingers when blending
- Not a pleasant 'taste'
- Difficult to remove with (lip) makeup remover

Overall, I would recommend this product if you want to achieve gradient lips and/or if you want your lip colour to stay on longer. If you're worried about this not being as moisturising as lip balm or lip stick, you can simply apply some clear gloss or balm and you're all good to go!

Mwah~!

Any requests for posts such as reviews, hauls and tutorials etc, please feel free to let me know :)


Disclaimer: Product was a free sample from an order purchased with my own money. This is not a sponsored post, nor am I affiliated with any of the companies mentioned. All opinions stated by me are 100% honest. 

Follow on Bloglovin

Sunday, August 4, 2013

Video FOTD: A Touch of Blush with ELES Mineral Makeup Products

Hello! I received some products from ELES Mineral Makeup to create my version of their Winter Seasonal Look 'A touch of blush'. It is suitable for both day and night and with my tutorial video, I share how easy it is to go from a daytime to evening look with the help of eyeliner. But either one can be worn anytime of the day!

It's August which means it's the last month of winter over here (summer in most parts of the world)! 

This is my completed look next to the look provided by ELES:

As you can see, I was not trying to do a replication! Just my own spin on it :)

This look is soft and ethereal combining flawless skin, contoured and understated eyes and a radiant blush of the lips and cheeks

Here are the 6 key products to use to achieve this look:

Still in their shrink wrapping

I've seen a number of bloggers create this look and to be a little 'different' I suppose, I decided to add in another ELES product that I already have and reviewed. Do you remember it?

It's the ELES Liquiliner in Anisette which I reviewed [here]!
Now I'll share a photo of the Liquiliner joining the other products :)

Happy ELES family

ELES cosmetics tend to be up in the high-end price range and this is definitely noticeable not only in the quality of their products but also with their sleek packing 

I did a video tutorial (more like a how-I-apply-my-makeup-with-these-products video) and I thought about doing a voice-over but unfortunately I didn't get around to doing it. Hope you'll still enjoy watching it if you choose to do so:


*Click to read more*
Related Posts Plugin for WordPress, Blogger...